Visit the TrainerLori YouTube channel for free training videos!
1.In bottom right corner of Windows 7 screen,
click Show Desktop button.
2. Right click on desktop. In dialog
box, select Screen Resolution.
3a. Under Multiple displays, select Extend these displays,
then click Apply
3b. A dialog box opens asking Do you want to keep these display
settings?
Click Keep changes.
Then click OK.
4. After extending the displays, click
the top of an application and drag it to the correct monitor.
Search This Blog
Tuesday, December 9, 2014
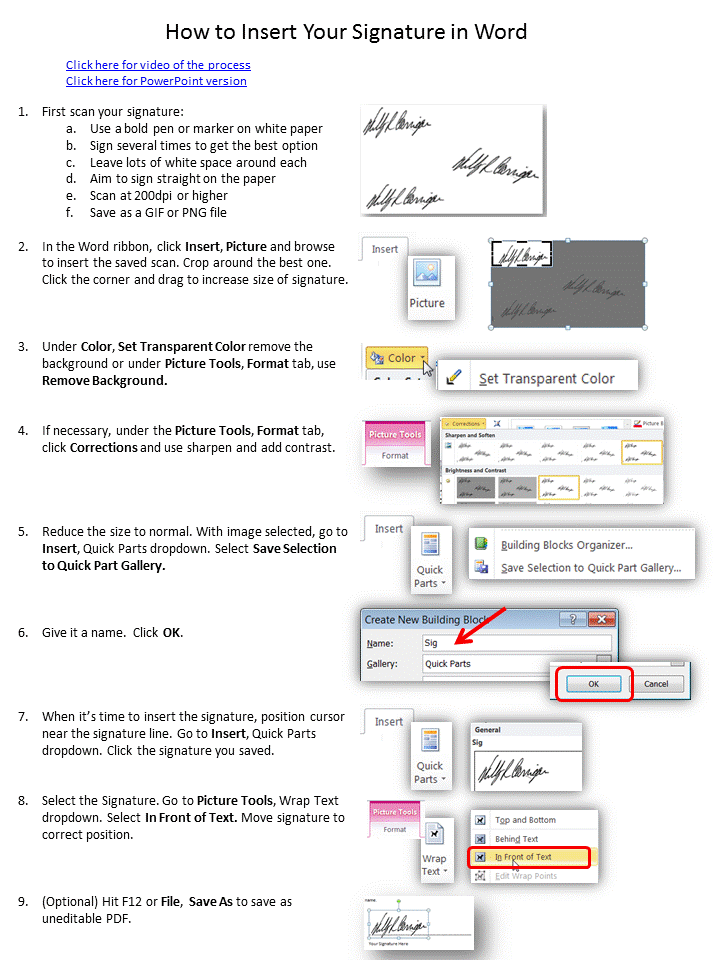
How to Insert Your Signature in Word
1.First scan your signature:
a. Use a bold pen or marker on white
paper
b. Sign several times to get the best
option
c. Leave lots of white space around
each
d. Aim to sign straight on the paper
e. Scan at 200dpi or higher
f. Save as a GIF or PNG file
2.In the Word ribbon, click Insert, Picture and browse to insert the saved scan. Crop around the best one. Click the corner and drag to increase size of signature.
3.Under Color, Set Transparent Color to remove the background or under Picture Tools, Format tab, use Remove Background.
4.If
necessary, under the Picture
Tools,
Format tab, click Corrections and
use sharpen
and add contrast.
5.Reduce the size to normal. With image selected, go to Insert, Quick Parts dropdown. Select Save Selection to Quick Part Gallery.
6.Give it a name. Click OK.
7.When it’s time to insert the signature, position cursor near the signature line. Go to Insert, Quick Parts dropdown. Click the signature you saved.
8.Select the Signature. Go to Picture Tools, Wrap Text dropdown. Select In Front of Text. Move signature to correct position.
9. (Optional) Hit F12 or File, Save As to save as uneditable PDF.

How to Create a Survey in SharePoint
Click here for a video of the process!
10.To
change or delete a question, click Settings,
Survey Settings. Click a question from the list to make
changes to it. To prevent the respondents from seeing or editing all responses, select Advanced Settings. Under Read Access, select Read responses that were created by the user.
1.On
the site where you have Member or Site Owner permission, go to Site Contents. (Click the gear in the top right corner to find Site Contents.)
2.Click
add an app. Search
for Survey. Click the Survey app to create it and give it a name.
3.Click
Settings. Add
Questions appears.
Click it to add questions to the survey.
4.Type
in the question as your respondent will read it.
5.Select
the type of answer you want for the question. Each type will have different
variables.
6.When
finished with the variables, click Next
Question
or Finish.
7.To
share the survey, go to the navigation bar and copy the URL. Paste it in the email.
8.When
they arrive at the site they will click Respond to this Survey.
9.To
see the responses, click Show all responses.
Wednesday, December 3, 2014
How to Merge Excel List into Word Labels
1.Create
the Excel list with each field (First Name, Last Name, Address, etc.) in
separate columns. Ensure there are no
blank rows in the list. Save and close
it.
2.Open a new document in Word.
3.In
the ribbon, click the Mailings
tab. In the Start Mail Merge group, click Start
Mail Merge command
dropdown. Select Labels…
4.The
Label Options window opens. Select label
vendor, then select label product number.
Click OK.
5.In the Start Mail Merge group, click Select Recipients command dropdown. Select Use Existing List…
6.A
browse window opens. Find and click on Excel list. Ensure the file name appears
in the selection box. Click Open.
7.A
Select Table box opens. If you have multiple worksheets with data, select the
list you want. Ensure the First row of data contains column headers
box
is selected if it is true. Click OK.
8.In
the Write & Insert Fields group, click Insert
Merge Field.
In order, click the field from your list that you want to appear on the label.
Click Insert. Be sure to hit Space, Comma
or Enter when appropriate. Code appears in one label.
9.In the Write & Insert Fields group, click Update Labels. Code goes into each label.
10.In the Write & Insert Fields group, click Preview Results. The code is replaced with the data.
11.In
the Finish group, click Finish
& Merge command dropdown. Click Print Documents…
12.The Merge to Print dialog box opens. Select which records to print. Before clicking OK, ensure the labels are in your printer facing the correct way. A Print dialog box opens. Make your selections and click OK.
Friday, August 2, 2013
Consolidate quickly sums in Excel
If you need to sum totals from several worksheets, try consolidate which does all the calculations for you! 1) Use the same headings on each data worksheet 2) In a new sheet, click in A1 3) Click Data, Consolidate 4) Choose Sum to add the totals 5) Add each of the data sheets 6) Click OK Consolidate will organize and sum all the sheets!
Subscribe to:
Posts (Atom)


