1.Plug
in the device into a USB port to your computer.
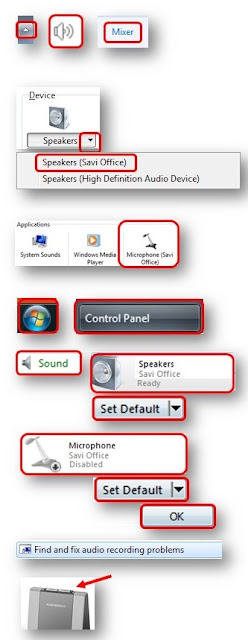
 2.In the
bottom right corner of the screen, click the arrow to open the system tray. Click the speaker icon
to open Speaker
Volume. Click Mixer to open Volume Mixer – Speakers.
3.Under
Device,
click the dropdown to
select speakers. From the list choose which speakers are your headset (and not
the internal audio device). In this
example, Savi
Office.
NOTE: The name on the device and the name
the computer recognizes may not be the same.
TIP: Search online for any other names for your device. The headset in this example says Plantronics on the device, but their website and the computer both call it Savi Office.
TIP: Search online for any other names for your device. The headset in this example says Plantronics on the device, but their website and the computer both call it Savi Office.
4.Check
to
see if your microphone is also listed.
If so, you are set up and can use the headset. If not, continue below.
5.Click
the Start
button. In the Start Menu, click Control
Panel.
6.Click
Sound. A
dialog box opens. Under the Playback tab,
check to see if your headset speakers appear.
If so, click the name of them. Then click Set
Default.
7.Under
the Recording tab,
find the headset microphone name and click it.
8.Click
Set
Default. Click OK.
9.If it
isn’t working, click Start and type in Find
and fix audio recording problems.
A wizard opens and will walk you through options to fix it.
10.If you
have a wireless headset with docking stand, ensure the correct button at the
top of the stand is selected (computer or phone) depending on how you want to
use the headset.
No comments:
Post a Comment