Search This Blog

Tuesday, December 9, 2014

How to Find Unsaved (MS Office) Files (within 3 days of closing)

For free training videos, visit the Trainer Lori YouTube channel!

You can recover a Microsoft Office file that has crashed after you have been working on it all day even if you forgot to save and AutoRecovery doesn't open.

1.In the ribbon click File. Click Options.

2.Click the Save tab.

3.Look for the AutoRecover file location. Select it and copy it.

4.Open Windows Explorer.

5.Paste the file location in the navigation bar.

6.Search by date, if needed.  Double click to open the file (or file folder to see multiple options).
NOTE: File name will be based on first line of text with additional code.

7. In File, manage the versions, if needed.

How to Delete Web History

For free training videos, visit the Trainer Lori YouTube channel!


Web history can clog resources and slow down searches. You can delete web history in both Google and Internet Explorer.

GOOGLE

1.In Google, enter a search topic (such as history) to display Google tools.

2.In the top right corner, click the gear. Select History.  You may need to re-enter your password to sign in to Google.

3.Searches appear newest to oldest.  To select older searches, click Older.

4.Select the searches to delete. Click Remove Items.


INTERNET EXPLORER

1.In Internet Explorer, select Tools, Delete Browsing History.

2.Select Preserve Favorites website data to keep files that enable your favorite websites to display faster.

3.Below the line, select what type of data to delete.

4.Click Delete.


How to Change Your Default Save Location

For free training videos, visit the Trainer Lori YouTube channel!


1.In any Microsoft Office program (Word, PowerPoint, Excel, etc.), click File, Options.

2.Click the Save tab.

3.Under Save documents, in the Default file locations, click Browse. This opens the Modify Location window.

4.Best Practice: If your OneDrive on SharePoint is synced to your C: drive, use that location to save your documents.  This is the only non-network location that can protect your information if your computer is damaged, lost or stolen.

5.Once the folder name is selected, click Ok. This closes  your Modify Location window.

6.Back in the Word Options window, click OK.

7.When saving a document, the save location now automatically goes to the new location.

How to Add Monitor to Extend Laptop Display

Visit the TrainerLori YouTube channel for free training videos!

1.In bottom right corner of Windows 7 screen, click Show Desktop button.

2. Right click on desktop. In dialog box, select Screen Resolution.
 

3a. Under Multiple displays, select Extend these displays, then click Apply

3b. A dialog box opens asking Do you want to keep these display settings? Click Keep changes. Then click OK.

4. After extending the displays, click the top of an application and drag it to the correct monitor.

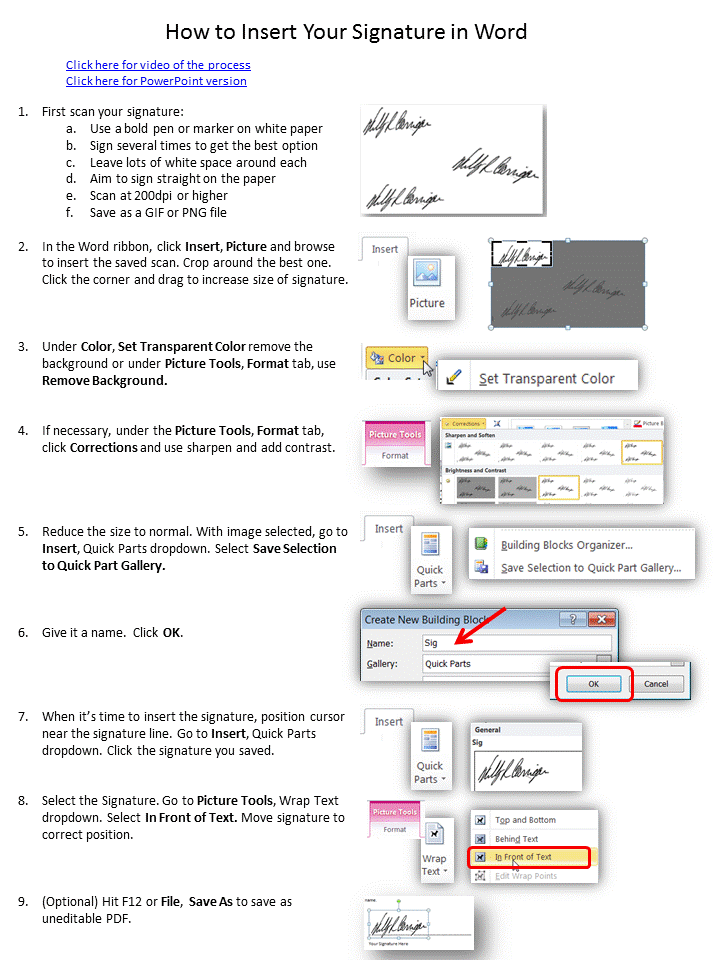
How to Insert Your Signature in Word


1.First scan your signature: 
a. Use a bold pen or marker on white paper
b. Sign several times to get the best option
c. Leave lots of white space around each
d. Aim to sign straight on the paper
e. Scan at 200dpi or higher
f. Save as a GIF or PNG file

2.In the Word ribbon, click Insert, Picture and browse to insert the saved scan. Crop around the best one. Click the corner and drag to increase size of signature.

3.Under Color, Set Transparent Color to remove the background or under Picture Tools, Format tab, use Remove Background.
4.If necessary, under the Picture Tools, Format tab, click Corrections and use sharpen and add contrast.

5.Reduce the size to normal. With image selected, go to Insert, Quick Parts dropdown. Select Save Selection to Quick Part Gallery. 

6.Give it a name.  Click OK.


7.When it’s time to insert the signature, position cursor near the signature line. Go to Insert, Quick Parts dropdown. Click the signature you saved.

8.Select the Signature. Go to Picture Tools, Wrap Text dropdown. Select In Front of Text. Move signature to correct position.

9. (Optional) Hit F12 or File, Save As to save as uneditable PDF.